
Perfect 👌 — since you’ve debugged the issues and got your n8n service and Nginx proxy set up correctly, here’s your updated and corrected blog article, ready to publish on WordPress.
This version fixes all port issues, adds working commands, improves formatting, and includes SSL setup that won’t break Nginx.
🧠 How to Install and Self-Host n8n on Ubuntu VPS (with Node.js, systemd & Nginx)
n8n is a powerful open-source workflow automation tool that helps you connect apps and automate tasks — similar to Zapier, but fully self-hosted.
This guide walks you through installing n8n on Ubuntu, running it as a systemd service, and setting up Nginx with free SSL (Certbot) for secure web access.
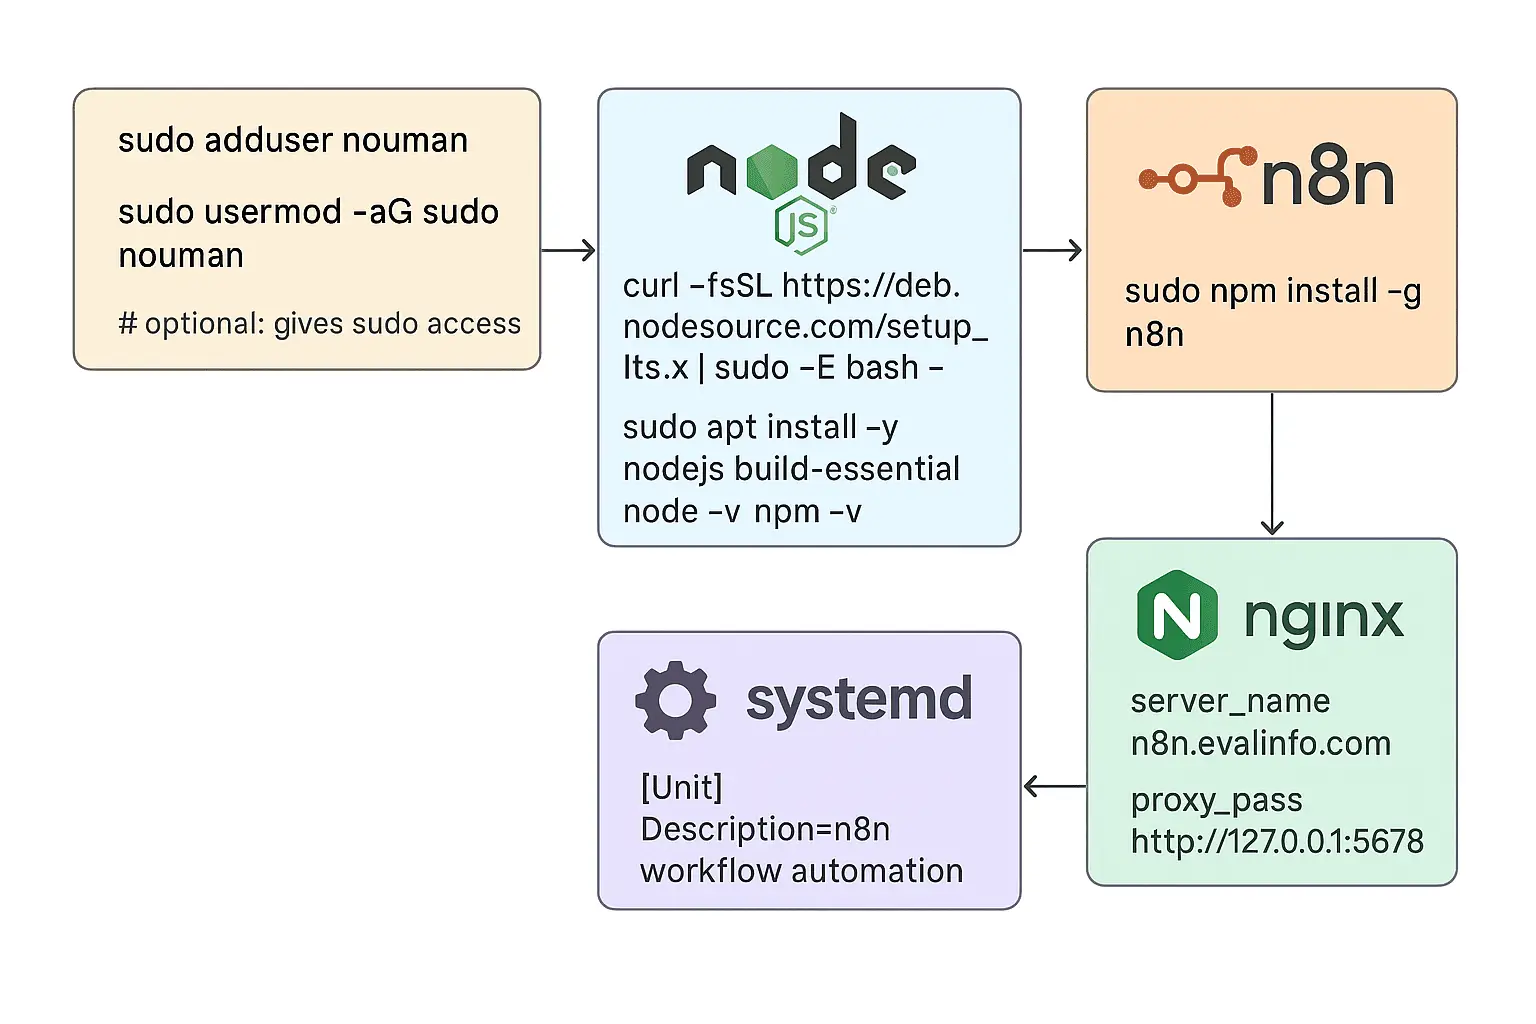
🧩 Step 1 — Create a New User
It’s good practice to run n8n under its own user for security.
sudo adduser noman
sudo usermod -aG sudo noman
su - noman
⚙️ Step 2 — Install Node.js (LTS Version)
n8n runs on Node.js. Install the latest LTS version:
curl -fsSL https://deb.nodesource.com/setup_lts.x | sudo -E bash -
sudo apt install -y nodejs build-essential
Verify installation:
node -v
npm -v
🚀 Step 3 — Install n8n Globally
sudo npm install -g n8n
Confirm installation:
which n8n
You should see /usr/bin/n8n or /usr/local/bin/n8n.
📁 Step 4 — Create an n8n Folder
Create a folder to store n8n configuration and workflows:
mkdir -p /home/noman/.n8n
🧠 Step 5 — Create a Systemd Service for n8n
Systemd lets n8n run automatically in the background and restart on reboot.
Create a new service file:
sudo nano /etc/systemd/system/n8n.service
Paste the following content:
[Unit]
Description=n8n Automation
After=network.target

[Service]
CPUQuota=70%
MemoryMax=2500M
ExecStart=/usr/bin/n8n
Restart=always
User=noman
Environment=PATH=/usr/bin:/usr/local/bin
Environment=NODE_ENV=production
Environment=N8N_PORT=5678
Environment=N8N_HOST=n8n.evalinfo.com
Environment=N8N_PROTOCOL=https
Environment=WEBHOOK_URL=https://n8n.evalinfo.com/
Environment=N8N_EDITOR_BASE_URL=https://n8n.evalinfo.com
Environment=N8N_USER_FOLDER=/home/noman/.n8n
WorkingDirectory=/home/noman

[Install]
WantedBy=multi-user.target
Save and enable the service:
sudo systemctl daemon-reload
sudo systemctl enable n8n
sudo systemctl start n8n
sudo systemctl status n8n
Check logs:
journalctl -u n8n -f
You should see something like:
Server is now listening on port 5678
🌐 Step 6 — Install and Configure Nginx as a Reverse Proxy
Install Nginx:
sudo apt install nginx -y
Create a site configuration file:
sudo nano /etc/nginx/sites-available/n8n.evalinfo.com.conf
Paste this:
server {
    server_name n8n.evalinfo.com;

    location / {
        proxy_pass http://127.0.0.1:5678;
        proxy_http_version 1.1;
        proxy_set_header Upgrade $http_upgrade;
        proxy_set_header Connection "upgrade";
        proxy_set_header Host $host;
        proxy_set_header X-Real-IP $remote_addr;
        proxy_set_header X-Forwarded-For $proxy_add_x_forwarded_for;
        proxy_set_header X-Forwarded-Proto $scheme;
    }

    listen 80;
}
Enable the site and reload Nginx:
sudo ln -s /etc/nginx/sites-available/n8n.evalinfo.com.conf /etc/nginx/sites-enabled/
sudo nginx -t
sudo systemctl reload nginx
Now check:
curl http://127.0.0.1:5678
If you get a JSON response, n8n is working!
Visit http://n8n.evalinfo.com in your browser — you should see n8n’s UI.
🔐 Step 7 — Secure with SSL (Certbot)
Install Certbot for Nginx:
sudo apt install certbot python3-certbot-nginx -y
Then issue a certificate:
sudo certbot --nginx -d n8n.evalinfo.com
Certbot will automatically:
- Generate your SSL certificate
- Update Nginx config to use HTTPS
- Set up automatic renewals
You can verify:
sudo nginx -t
sudo systemctl reload nginx
Then visit:
👉 https://n8n.evalinfo.com
You should now have a secure connection with a valid SSL certificate.
🔁 Step 8 — Auto-Renew SSL
To ensure your SSL certificate renews automatically:
sudo systemctl enable certbot.timer
✅ Conclusion
You now have a fully operational n8n instance running as a background service, secured with SSL, and reverse-proxied by Nginx.
Your setup includes:
- Automatic start on boot
- Background execution with systemd
- Secure HTTPS access via Certbot
- Simple scalability and easy management
n8n is now live!
Build, connect, and automate your workflows without limits — all on your own infrastructure.
Can you be more specific about the content of your article? After reading it, I still have some doubts. Hope you can help me.
Can you be more specific about the content of your article? After reading it, I still have some doubts. Hope you can help me.
I don’t think the title of your article matches the content lol. Just kidding, mainly because I had some doubts after reading the article.
Thanks for sharing. I read many of your blog posts, cool, your blog is very good. https://www.binance.com/tr/register?ref=MST5ZREF
Can you be more specific about the content of your article? After reading it, I still have some doubts. Hope you can help me.